
 |
||||
 |
 |
 |
 |
 |
Wednesday, March 7, 2012
Horned Lizards for Sale
I made another Horned Lizard in more realistic khaki and brown colors. Both of these cool lizards are now for sale on etsy.
Wednesday, February 29, 2012
Horned Lizard aka Horny Toad
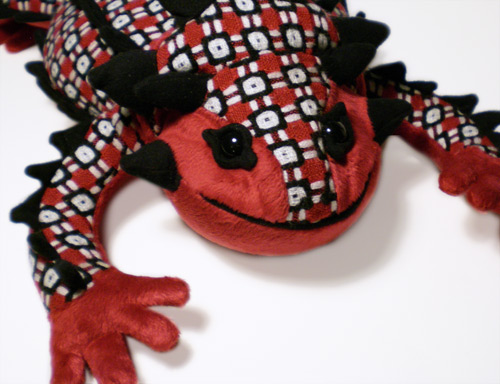
As a kid in New Mexico, my brother and I would occasionally find Horned lizards, but we always called them Horny toads. Even though they have spikes all over they have really soft bellies and you can still pet their spikes. I always thought they were super cute and sweet, so why not make a soft plush version.
When I was starting with my sketches, I had a hard time visualizing all the parts together so I quickly made a clay sculpt to help me work out the shapes for the pattern.


This is a much more complex project then I usually take on, mostly due to the spike details, but I'm very excited about how it came out. I do plan on making some in more realistic brown tones, but I couldn't wait for that fabric shipment to arrive so I went with a bold pattern of red, black and white. This one is the Darth Maul of horned lizards.


My favorite horned lizard factoid is that they shoot blood out of their eyes to deter predators.
Thursday, February 16, 2012

Wednesday, February 8, 2012
T-shirt Quilts
I made my first t-shirt quilt in 2008. It was comprised of shirts I wore in high school and college. I pieced it by machine, but did the quilting by hand. It took a long time, but was a nice thing to sew during the winter. I think t-shirt quilts are a great way to keep all the memories that come along with clothing you don't wear anymore.


I just finished a t-shirt quilt for my friend Liz. She saved a bunch of t-shirts that she had stopped wearing but didn't want to get rid of. I put a little more planning into putting all these different t-shirts together in an interesting way. Liz didn't really care how I put it together and she had seen the quilt I had made for myself. I went with a jigsaw puzzle theme to connect all the images. I pieced all the panels together by machine and did a combination of machine and hand stitching to quilt it.

A detail with Alec's t-shirts design right next to his friend Aaron's awesome shirt design. Obviously I did this on purpose since they're friends, so their t-shirts are friends too.

A detail of some hand and machine stitching on the bottom edge. Knit is stretchy so it can be forgiving which is usually nice except on a quilt when you want no stretch at all.

Liz chose a soft, cotton flannel printed with multi-colored stripe plaid for the back. I finished the edges with a light blue cotton bias that was left over from the wedding quilt I made.
 | |||||||||||||
| Finished size 61 in. x 61 in. |


I just finished a t-shirt quilt for my friend Liz. She saved a bunch of t-shirts that she had stopped wearing but didn't want to get rid of. I put a little more planning into putting all these different t-shirts together in an interesting way. Liz didn't really care how I put it together and she had seen the quilt I had made for myself. I went with a jigsaw puzzle theme to connect all the images. I pieced all the panels together by machine and did a combination of machine and hand stitching to quilt it.
 |
| Finished size 62 in. x 90 in. |
A detail with Alec's t-shirts design right next to his friend Aaron's awesome shirt design. Obviously I did this on purpose since they're friends, so their t-shirts are friends too.

A detail of some hand and machine stitching on the bottom edge. Knit is stretchy so it can be forgiving which is usually nice except on a quilt when you want no stretch at all.

Liz chose a soft, cotton flannel printed with multi-colored stripe plaid for the back. I finished the edges with a light blue cotton bias that was left over from the wedding quilt I made.
Thursday, February 2, 2012
My first felted wool hat

Since I knit all the time, my first instinct was to knit the hat, but even with my limited skill I knew crocheting would be faster. With a size 9 (5.5mm) crochet hook I double crocheted the hat, trying to make the stitches as loose a possible.
 |
| Misshapen crocheted hat before felting |
If I was to leave it as is, it would make a very misshapen hat. I don't have much felting experience but I knew that I could manipulate the shape of the finished hat.
I did a test swatch of the yarn to see how it would felt and how much it would shrink. I did this by hand in the sink. The swatch didn't shrink too much but it didn't felt much either, which I attributed to not agitating it long enough. I took my chances and once the crocheted hat was done I stuck it in a bag and attempted felting it in the washing machine. This didn't turn out well, it really didn't felt much at all. I didn't try the machine technique again, instead I attacked the hat by hand in the sink. I used to dish scrubber brush to rough up the fibers to get them to grab each other. It took awhile, but the fibers eventually felt together.
With the hat still wet but felted to my satisfaction, I created a makeshift hat mold out of Alec's Darth Vader cookie jar and some cardboard. It took about 48 hours to completely dry, but once it did the wonky crochet shape was gone and it was a nice round shaped hat with a flat brim. On the inside I added a ribbon band to give some stability to the size.
 |
| Finished felted hat |
The finished hat is not felted to the extent that you can no longer see
any of the stitches but it does have a nice texture and it very much bonded together. I added a flower pin made from pre-made felt and embroidery floss.
My mom loves the hat, so I would call it a success.
Thursday, January 26, 2012
Edward the Horse

I really like interpreting very stylized drawings into plush, it presents some challenges but it's fun to solve those problems. The biggest one I initially faced turning Edward into a 3D toy was deciding how to treat his eyes since as they are drawn they exist on one side of his face. Edward also has a substantial rump, so smoothly creating his overall shape took some time.
Check out the book, it's a great story that just happens to explain the basics of cartooning. It will make you pick up a pencil and start creating your own comics.


Thursday, January 19, 2012
Knitted Winter hats

All these hats have the same basic pattern. Once I got the hang of making them to fit to a specific size, I started a making a bunch. All these hats start at the crown and work down.
Here are the basic instructions. Begin by crocheting a chain of 4 stitches, loop them together to make a ring. Double crochet into the ring 8 stitches. Pick up these stitches with double ended knitting needles, 2 stitches on each needle. Pick up an additional stitch at the beginning of each needle.
 |
| Pick up and knit the red stitch to make the increase. |

This pink one is somewhat in progress, I may not finish it. I got excited using up scraps of yarn for the hearts and I like the colors but I don't have an intended owner so it may get unraveled. It has the same zigzag pattern running down the sides. This one starts with a ring of 10 stitches instead of 8 to create the star pattern on the top.

I made this striped one after I lost a hat while in Somerville. These aren't colors I wear all the time but I did like the combination and it's good to add some different colors into my winter wardrobe. Plus you can never go wrong adding a fun pom pom to the top of a hat.
Subscribe to:
Posts (Atom)