I live in New Mexico where adobe homes are the norm. As a gift for a friend who both likes toads and grew up in Santa Fe, I made an adobe toad abode.
I thought about a lot of ways to make this before I started. When you look up toad homes, they often recommend just flipping over a terra cotta pot and making a little opening so the toad can get in. I wanted mine to be more custom. I have seen square terra cotta pots, but I was worried I would crack it trying to cut the door out. Instead I went with making it out of plaster of Paris. I made a quick mold out of cardboard. It was pretty sloppy so when the house came out I had to sand it a fair amount, but that's part of the charm of the Southwest, everything out here is a little DIY. I painted it with acrylic paint, then glued on the wood vigas. For the final touch of Santa Fe, I made a chile ristra out of sculpey to hang from the vigas. Once baked, I sealed the ristra with clear acrylic nail polish.
It's winter so any frogs or toads that would be in NM are hibernating, but hopefully with its new home in Maine, come springtime, there will be a toad waiting list to live in this one of a kind adobe home.
UPDATE: Unfortunately due to poor packing on my end and rough handling from USPS it didn't survive the trip to Maine. I still like this idea a lot so I may try to make a stronger one in the future, plus add more turquoise and howling coyotes.
Showing posts with label Miscellaneous. Show all posts
Showing posts with label Miscellaneous. Show all posts
Wednesday, January 31, 2018
Tuesday, December 31, 2013
Creative Inspiration: Vintage Fabric
For Thanksgiving this year Alec and I headed up to Seattle to visit his family. While we were there we looked through some of his boxes in storage to see what he could get rid off. This reminded his mom that she had some old fabric that she wanted me to look through, and here is what I came home with. It's an amazing collection from the '60s to the '80s, leftovers from when she made outfits for her kids. Most of the fabric is in small pieces, but for some prints there is a yard or more. I'm very excited to dream up some projects to put this fabric to good use.
Many of these pieces are from blouses that Breck (Alec's mom) wore as a teen.
The mouse panel is fabric that Alec remembers from when he was a toddler. I really like the angry lion on the top red corduroy.
Many of these pieces are from blouses that Breck (Alec's mom) wore as a teen.
The mouse panel is fabric that Alec remembers from when he was a toddler. I really like the angry lion on the top red corduroy.
Wednesday, September 18, 2013
Creative Inspiration: Antique Buttons
Along with the Dream Pets Book, for my birthday, I also received a very special gift my aunt. A collection of buttons that she was given by her aunt, my great-aunt. My guess on the time period is the 1920's to the 1950's or '60's. They are composed of all different materials: metal, bakelite, mother-of-pearl, glass and more. I've started to research the proper way to clean them, as there is rust, oxidation and other signs of age. I've only gotten as far as separating them into smaller collections. I'll have to carefully and gently clean each one before I decide what to do with them. It's such a beautiful collection, I can't wait to utilize these buttons in new outfits and creations.
Since I'm not sure of the metals, there are various signs of rust and oxidation. I'll have to find a good technique to cleaning them without damaging them.
I ended up sorting most of the buttons myself as they were just loose in a box. This was a grouping that was already tied together, I love the purple color with the gold detail.
I love this mother-of-pearl clasp, it's such a neat design. I'll have to make a belt or something to show off its beauty.
Friday, September 6, 2013
Creative Inspiration: Dream Pets
A couple of months ago, I found this awesome aviator tiger toy at a thrift store in Oakland. I loved it so I looked up more about it. It turns out it part of a re-lease of a collection of popular toys from the 1960's called Dream Pets made by Dakin. I did a little more research and found that they made all sorts of different animals with silly themes, many are available on eBay. I also found out about this Japanese book called Dream Pets Book by Satoshi Yamashita, that details all the different Dream Pets that were manufactured. Since it's in Japanese and out of print, it was hard to find a copy but Alec bought it for me for my birthday. I love it, and it's easier to get the book than start collecting more toys that I don't have room for.
There is even a section where they do over how the Dream Pets were manufactured. The original ones were stuffed with sawdust! I love all the different animals, how they are simple but have so much character. I've very inspired to make some new toy designs of my own.
Thursday, June 7, 2012
Tugboat Press table banner
Greg of Tugboat Press commissioned me to make a banner that would go on his table during conventions. He already had a great logo, so I just had the task of turning that into an eye-catching banner. I constructed it out of polyester poplin, so it would be wrinkle resistant and long wearing. Keep an eye out for Greg and his new table banner at the next comic fest in your town. If you haven't read the awesome comics that Tugboat Press has put out, check them out now!
Wednesday, February 8, 2012
T-shirt Quilts
I made my first t-shirt quilt in 2008. It was comprised of shirts I wore in high school and college. I pieced it by machine, but did the quilting by hand. It took a long time, but was a nice thing to sew during the winter. I think t-shirt quilts are a great way to keep all the memories that come along with clothing you don't wear anymore.
I just finished a t-shirt quilt for my friend Liz. She saved a bunch of t-shirts that she had stopped wearing but didn't want to get rid of. I put a little more planning into putting all these different t-shirts together in an interesting way. Liz didn't really care how I put it together and she had seen the quilt I had made for myself. I went with a jigsaw puzzle theme to connect all the images. I pieced all the panels together by machine and did a combination of machine and hand stitching to quilt it.
A detail with Alec's t-shirts design right next to his friend Aaron's awesome shirt design. Obviously I did this on purpose since they're friends, so their t-shirts are friends too.
A detail of some hand and machine stitching on the bottom edge. Knit is stretchy so it can be forgiving which is usually nice except on a quilt when you want no stretch at all.
Liz chose a soft, cotton flannel printed with multi-colored stripe plaid for the back. I finished the edges with a light blue cotton bias that was left over from the wedding quilt I made.
 | |||||||||||||
| Finished size 61 in. x 61 in. |
I just finished a t-shirt quilt for my friend Liz. She saved a bunch of t-shirts that she had stopped wearing but didn't want to get rid of. I put a little more planning into putting all these different t-shirts together in an interesting way. Liz didn't really care how I put it together and she had seen the quilt I had made for myself. I went with a jigsaw puzzle theme to connect all the images. I pieced all the panels together by machine and did a combination of machine and hand stitching to quilt it.
 |
| Finished size 62 in. x 90 in. |
A detail with Alec's t-shirts design right next to his friend Aaron's awesome shirt design. Obviously I did this on purpose since they're friends, so their t-shirts are friends too.
A detail of some hand and machine stitching on the bottom edge. Knit is stretchy so it can be forgiving which is usually nice except on a quilt when you want no stretch at all.
Liz chose a soft, cotton flannel printed with multi-colored stripe plaid for the back. I finished the edges with a light blue cotton bias that was left over from the wedding quilt I made.
Thursday, February 2, 2012
My first felted wool hat
Last month, for my mom's birthday I attempted a new project. In one of my knitting books there are instructions on how to make a crocheted and felted hat. I had in my yarn stash a nice dark purple wool yarn, purple being my mom's favorite color. Sadly the instructions were for a child-sized hat and a yarn that I didn't have, so I used those instructions for inspiration and made up the actual pattern.
Since I knit all the time, my first instinct was to knit the hat, but even with my limited skill I knew crocheting would be faster. With a size 9 (5.5mm) crochet hook I double crocheted the hat, trying to make the stitches as loose a possible.
If I was to leave it as is, it would make a very misshapen hat. I don't have much felting experience but I knew that I could manipulate the shape of the finished hat.
I did a test swatch of the yarn to see how it would felt and how much it would shrink. I did this by hand in the sink. The swatch didn't shrink too much but it didn't felt much either, which I attributed to not agitating it long enough. I took my chances and once the crocheted hat was done I stuck it in a bag and attempted felting it in the washing machine. This didn't turn out well, it really didn't felt much at all. I didn't try the machine technique again, instead I attacked the hat by hand in the sink. I used to dish scrubber brush to rough up the fibers to get them to grab each other. It took awhile, but the fibers eventually felt together.
With the hat still wet but felted to my satisfaction, I created a makeshift hat mold out of Alec's Darth Vader cookie jar and some cardboard. It took about 48 hours to completely dry, but once it did the wonky crochet shape was gone and it was a nice round shaped hat with a flat brim. On the inside I added a ribbon band to give some stability to the size.
Since I knit all the time, my first instinct was to knit the hat, but even with my limited skill I knew crocheting would be faster. With a size 9 (5.5mm) crochet hook I double crocheted the hat, trying to make the stitches as loose a possible.
 |
| Misshapen crocheted hat before felting |
If I was to leave it as is, it would make a very misshapen hat. I don't have much felting experience but I knew that I could manipulate the shape of the finished hat.
I did a test swatch of the yarn to see how it would felt and how much it would shrink. I did this by hand in the sink. The swatch didn't shrink too much but it didn't felt much either, which I attributed to not agitating it long enough. I took my chances and once the crocheted hat was done I stuck it in a bag and attempted felting it in the washing machine. This didn't turn out well, it really didn't felt much at all. I didn't try the machine technique again, instead I attacked the hat by hand in the sink. I used to dish scrubber brush to rough up the fibers to get them to grab each other. It took awhile, but the fibers eventually felt together.
With the hat still wet but felted to my satisfaction, I created a makeshift hat mold out of Alec's Darth Vader cookie jar and some cardboard. It took about 48 hours to completely dry, but once it did the wonky crochet shape was gone and it was a nice round shaped hat with a flat brim. On the inside I added a ribbon band to give some stability to the size.
 |
| Finished felted hat |
The finished hat is not felted to the extent that you can no longer see
any of the stitches but it does have a nice texture and it very much bonded together. I added a flower pin made from pre-made felt and embroidery floss.
My mom loves the hat, so I would call it a success.
Friday, January 6, 2012
Stuffed Frog Head
My awesome friend Liz Prince had a pretty big birthday last month and for the occasion I made her a stuffed and mounted frog head. When I designing it, I had a toad in mind, but the since I ended up using a dark sage green fabric it ended up looking more like a frog.
I approached making this the same way I make most plush things. I made couple sketches, then decided on a design and tightened it up to use as a guide as I made the fabric pattern.
As you can tell, since fabric is such a flexible material, there are always changes from the tight drawing to the finished piece. It's not really necessary to make such a tight image for a plush concept, but it helps give me a very clear image to work from. I found some plush that had little bumps already pressed into the fabric, which I thought would add some warty texture. Sadly because I stuffed the head so firmly, all the bumps were pushed out and lost.
The eyes are clear plastic half domes painted from the inside with acrylic to maintain their shine.
Here's something new that I learned as a shortcut when you're short on time. If you can't actually use wood stain because it takes a long time to fully dry, you can substitute thinned acrylic paint. It dries very quickly and it much less strong smelling. I'm not sure that acrylic would work on all woods, but the plaque I got was unfinished pine, so it soaked up the color. I covered the painted wood with a clear shiny shellac spray finish.
Liz already has quite a collection of mounted fake animal heads so this frog has found a nice place at her pad.
Sunday, January 1, 2012
Happy 2012!
Happy New Year and to celebrate I'm updating the site slightly, out with the old 2011 header:
In with the new header:
A little something new for the new year which will hopefully be filled with some exciting changes and new places.
In with the new header:
A little something new for the new year which will hopefully be filled with some exciting changes and new places.
Wednesday, September 21, 2011
Pigeon molding experiment
I had a dream a couple of years ago about city wall space getting so sparse that people starting spraying graffiti on live pigeons. It seemed like a crazy concept, so I thought I might try to sculpt some pigeons and then paint graffiti pieces on them.
I have made different kinds of molds throughout the years, but I wanted to try some potentially more environmentally friendly materials. Silicon is a great molding material as it picks up excellent detail and cures very quickly. The problem with silicon is that after you're finished using the mold, it's gonna be around for a long time. Looking up some options, liquid latex seemed like a good fit for what I wanted. It's natural, coming from the rubber tree, it will eventually break down and it holds excellent detail. It is mildly toxic as the liquid part contains ammonia. Since it's so flexible, an additional mother mold is needed to hold it in place. By using plaster to make the mother mold, I'm still using a material that will naturally break down.
I sculpted a sleeping pigeon using Roma Plastilina #2 medium, I've used this material with success before. I like that you can use it over again since it's oil based and doesn't dry out. I did have some problems creating details. With the summer heat, it stayed pretty soft at room temperature. I was constantly sticking my sculpture in the freezer to cool it down so I could carve out more intricate details. In the future, for small detailed items I'm going to try either #3 or #4 hardness or Castiline.
I purchased liquid latex through the Compleat Sculpter in New York. It was really easy to apply the latex with a brush, but it is a slow process since you need to wait for each layer to dry. It took about a day, since I worked on other things as each layer dried. After 9 layers, the latex mold was complete and I was ready to make the supporting mother mold.
My sculpture has undercuts, so I had to make a 2-part mold mother. I used more plastilina to divided the mold into two parts, then poured the first part in plaster. After the plaster set (about 45 minutes), I still waited about 2 hours for it to really set and dry. Then I applied one coat of liquid latex to the finished plaster side so that the 2 parts of the mold wouldn't stick to each other.
I poured the second part of the mold, then waited a couple more hours for all the pieces to dry before pulling it apart.
I made a cast using more plaster. Latex is pretty great because it doesn't stick to much, I was able to cast without a mold release agent. Maybe latex is too flexible, because I had some problems getting it to sit right in the mother. In some ways, it's awesome to play up the distortion factor you can get with latex, but that's not what I was looking for with this project. After a couple wonky looking plaster pigeons, I decided that I was too sloppy with the first mold and attempted another. By making the pigeons out of biodegradable plaster, I don't feel bad about throwing my mistakes away.
The second time I made a 4-part mother and was much more careful about dividing the mold into pieces and molding them with care. I also made a rectangle box support to hold the mold while it cured. The 4-part mold worked a lot better, maybe because it was my second time doing it.
I'm happy with the result. It pretty much looks like the dream I had, except for the pigeons were still living in my dream, but I don't condone painting any living thing with spray paint.
I have made different kinds of molds throughout the years, but I wanted to try some potentially more environmentally friendly materials. Silicon is a great molding material as it picks up excellent detail and cures very quickly. The problem with silicon is that after you're finished using the mold, it's gonna be around for a long time. Looking up some options, liquid latex seemed like a good fit for what I wanted. It's natural, coming from the rubber tree, it will eventually break down and it holds excellent detail. It is mildly toxic as the liquid part contains ammonia. Since it's so flexible, an additional mother mold is needed to hold it in place. By using plaster to make the mother mold, I'm still using a material that will naturally break down.
I sculpted a sleeping pigeon using Roma Plastilina #2 medium, I've used this material with success before. I like that you can use it over again since it's oil based and doesn't dry out. I did have some problems creating details. With the summer heat, it stayed pretty soft at room temperature. I was constantly sticking my sculpture in the freezer to cool it down so I could carve out more intricate details. In the future, for small detailed items I'm going to try either #3 or #4 hardness or Castiline.
 |
| Original pigeon in plastilina |
 |
| Latex covered sculpt, I added additional pieces to the back to remove the undercut |
My sculpture has undercuts, so I had to make a 2-part mold mother. I used more plastilina to divided the mold into two parts, then poured the first part in plaster. After the plaster set (about 45 minutes), I still waited about 2 hours for it to really set and dry. Then I applied one coat of liquid latex to the finished plaster side so that the 2 parts of the mold wouldn't stick to each other.
 |
| First half of plaster mother: I thought using a plastic jug would make it easier for the mold, but I was wrong. |
I poured the second part of the mold, then waited a couple more hours for all the pieces to dry before pulling it apart.
 |
| Two part plaster mold encasing the latex mold |
I made a cast using more plaster. Latex is pretty great because it doesn't stick to much, I was able to cast without a mold release agent. Maybe latex is too flexible, because I had some problems getting it to sit right in the mother. In some ways, it's awesome to play up the distortion factor you can get with latex, but that's not what I was looking for with this project. After a couple wonky looking plaster pigeons, I decided that I was too sloppy with the first mold and attempted another. By making the pigeons out of biodegradable plaster, I don't feel bad about throwing my mistakes away.
 |
| A mutant pigeon |
The second time I made a 4-part mother and was much more careful about dividing the mold into pieces and molding them with care. I also made a rectangle box support to hold the mold while it cured. The 4-part mold worked a lot better, maybe because it was my second time doing it.
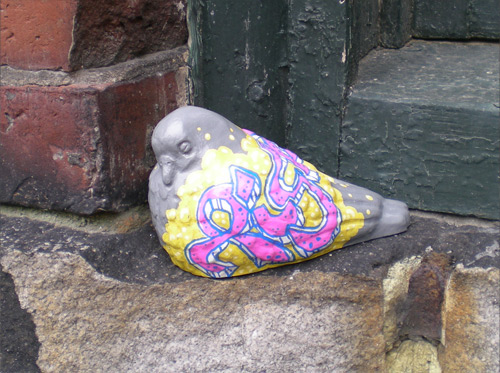
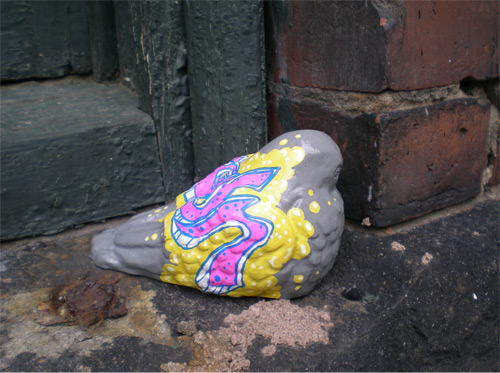
Once the mother mold had cured, I cast a pigeon in plaster. I painted the undercoat in grey gloss enamel spray paint (so much for environmentally friendly.) Then I used paint markers to create the graffiti.
I'm happy with the result. It pretty much looks like the dream I had, except for the pigeons were still living in my dream, but I don't condone painting any living thing with spray paint.
Wednesday, August 3, 2011
Dana & Jon's Wedding Quilt
| Front |
| Back |
Check out more photos on flickr
Monday, May 23, 2011
My first 24-hour Comic
Alec and I went up to Montreal this past weekend to participate in a 24-hour comic event hosted by GrandPapier. Since Alec is a cartoonist, he has done many 24-hour comics, while I've never really drawn a single comic. I was overwhelmed to make my first comic within 24 hours, luckily Alec wanted to collaborate with me. He drew, inked and came up with the story (with a little input from me) and I painted it with watercolors. We made it in 17 hours and 45 minutes. Good thing I have lots of experience sitting and doing one thing for many hours. It was fun and maybe next year I'll try one all by myself.
Read the whole comic here.
Read the whole comic here.
Subscribe to:
Posts (Atom)
