Wednesday, April 24, 2013
Stumptown Comics Fest
Riding on Alec's coattails, I'll be in Portland this weekend at the Stumptown Comics Fest!
My Fluff Engine table will packed with lots of new stuffed animals and patterns. I will also have the first issue of my Terrible Movie Nights zine. Since I moved back to Oakland last year, I've been watching bad movies with friends and making custom watercolor paintings inspired by the films. I started a blog to share the paintings, but thought it would be fun to collect everything in a zine.
There will be all sorts of awesome comics and zine to check out so if you're in the Pacific Northwest come on by.
Wednesday, April 10, 2013
Shelly the Tortoise
I just finished a new plush design, Shelly the Tortoise. I was trying to make a simpler pattern for the collection and I thought a tortoise would be a nice addition. For the most part, I choose a new animal based on how fun it would be to make. I really like the shape of tortoise legs, especially when they're walking, slowly of course. For my simplified version, I made the legs a little floppy so Shelly can strike a couple different poses.
I've made several different variations of Shelly the Tortoise and they're available for sale in my etsy store. I'm currently working on the pattern instructions and I hope to have the pattern available for sale in a couple weeks.
Wednesday, April 3, 2013
Bicycle Bag
Since September of last year, I've been going out once a week to teach the fashion design club at Woodside Priory school. I take Bart to Caltrain, get off in Menlo Park and bike the rest of the way to the school, about 7 miles. When I first started I was just taking a backpack, but it was weighing me down and hurting my back, so I had to figure out a better solution. I already have a back rack attached to my bike so why not use it.
The first version I tried was just a tote bag that I strapped to the rack. I kept adding pieces to make it easier to attach, like velcro and buckles, it looked pretty funky but it did the job. I looked up some options on bags to buy, but they seemed more geared to hardcore bicyclists and tour cycling. I just wanted a bag that I could pop on and off my bike. I also didn't need two full saddle bags and I liked the feel of something that I could attach to the top of the rack.
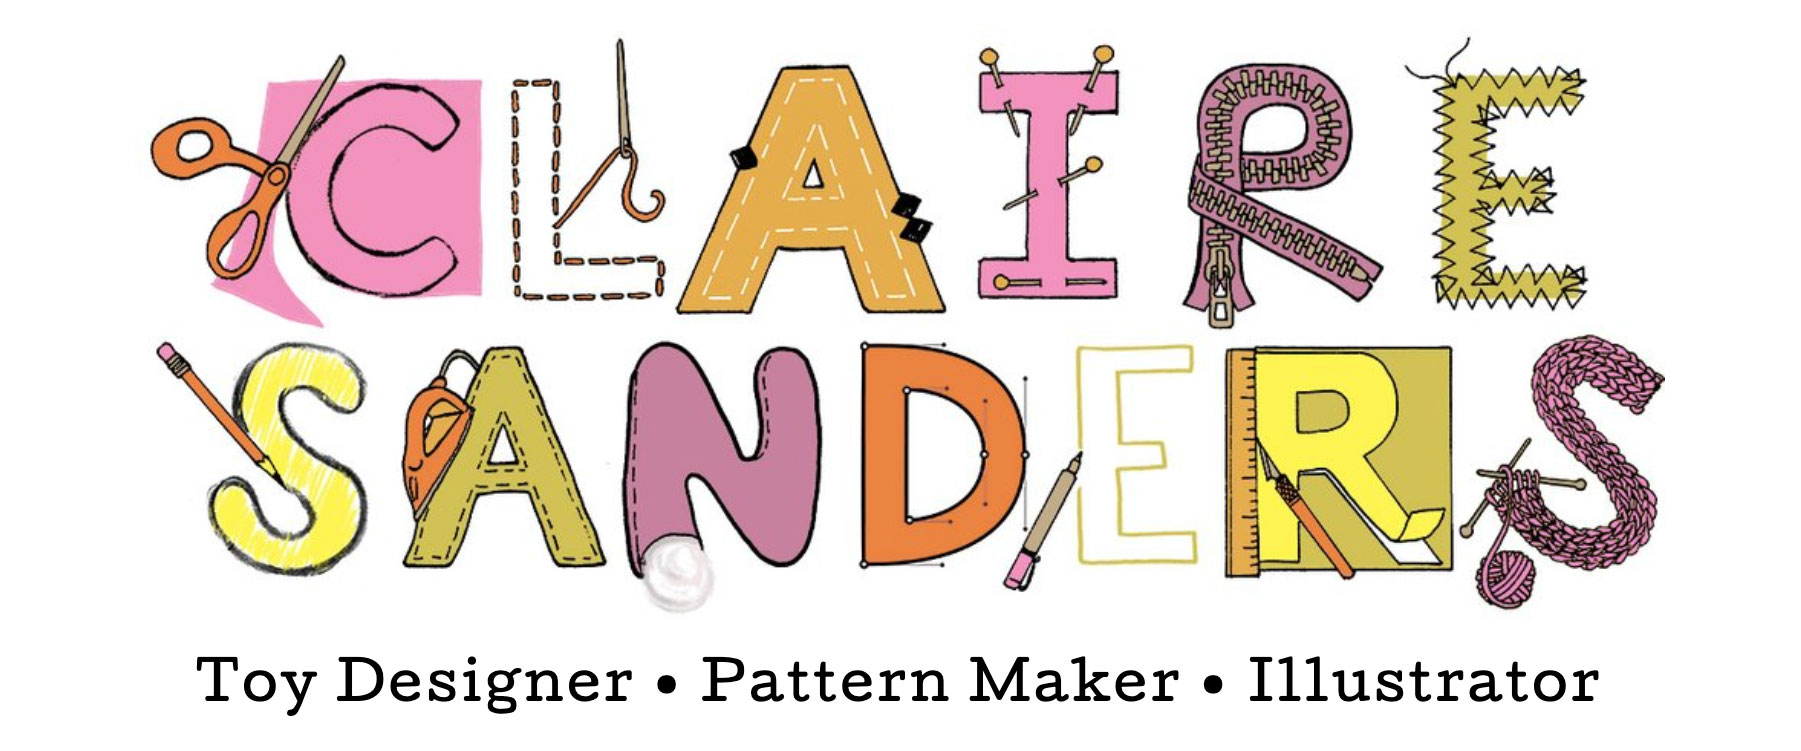
Last week, the zipper broke on my funky bag, so it was time to tackle making a custom bag with my personal specifications. The biggest factor was making it attach securely to the rack, while still being easy to remove. Every week I take a different amount of things with me, so I wanted a way to make it expandable to fit a variety of things.
I do have a fair amount of fabric in my stock so when I begin a new project I try to use some existing instead of buying all new materials. A friend's mom had given me this upholstery fabric a couple years ago for helping her get used to her sewing machine. It's feels like embossed vinyl with a fabric backing, it probably has a real name that I don't know.
With the drawstring top it does expand a fair amount, I haven't
tested its limits yet. The interior is nylon, it's not waterproof but
at least it's a little more water resistant than the cotton that makes
up the outside.
There is a zipper pocket in the front for easy access to small items. There is a removable cardboard panel that slides into the bottom interior to give it some stability so it doesn't just flop over the rack.
The panels on the bottom wrap around the sides of the rack and snap to the back, it's actually really secure but still easy to get off again.
The back has a reflective strip and a place to attach lights. The straps also have snaps on them so they're adjustable and they can be reconfigured in different ways to secure the bag.
The first version I tried was just a tote bag that I strapped to the rack. I kept adding pieces to make it easier to attach, like velcro and buckles, it looked pretty funky but it did the job. I looked up some options on bags to buy, but they seemed more geared to hardcore bicyclists and tour cycling. I just wanted a bag that I could pop on and off my bike. I also didn't need two full saddle bags and I liked the feel of something that I could attach to the top of the rack.
Last week, the zipper broke on my funky bag, so it was time to tackle making a custom bag with my personal specifications. The biggest factor was making it attach securely to the rack, while still being easy to remove. Every week I take a different amount of things with me, so I wanted a way to make it expandable to fit a variety of things.
I do have a fair amount of fabric in my stock so when I begin a new project I try to use some existing instead of buying all new materials. A friend's mom had given me this upholstery fabric a couple years ago for helping her get used to her sewing machine. It's feels like embossed vinyl with a fabric backing, it probably has a real name that I don't know.
There is a zipper pocket in the front for easy access to small items. There is a removable cardboard panel that slides into the bottom interior to give it some stability so it doesn't just flop over the rack.
The panels on the bottom wrap around the sides of the rack and snap to the back, it's actually really secure but still easy to get off again.
The back has a reflective strip and a place to attach lights. The straps also have snaps on them so they're adjustable and they can be reconfigured in different ways to secure the bag.

Friday, March 29, 2013
Georgie Monster Pattern
I finally finished the instructions for another pattern. You can now make Georgie Monsters of your very own!
The patterns are available for sale in my store or in my etsy shop.
Sunday, March 17, 2013
Pink Cable Braid Scarf
I haven't been working on many knitting projects this winter but I did just finish up a scarf incorporating a braid cable knit. I'm still new to cables, but they are fun and add lots on nice texture. I used a size 5 needle with sport weight yarn. The white was something old in my bag I was excited to use up. The bright pink yarn I picked up at the Bazaar Bizarre holiday fair in San Francisco. It's hard to see but the pink has little sparkly bits running through it.
Here are the basic instructions I used for just the braid cable:
Braid/plait cableRight cable panel of 13 sts
6-sts right cable: Sl sts to cn and hold to front of work, k3,k3 from cn
Row 1 (RS); P2, k9, p2.
Row 2 and all WS rows: K the knit sts and p the purl sts.
Row 3: P2, 6-sts left cable, k3, p2.
Row 5: Rep row 1.
Row 7: P2, k3, 6-st right cable, p2.
Row 8: Rep row 2
Rep rows 1-8
Wednesday, March 6, 2013
Mail Bunnies
Just in case you weren't getting enough drawings of my rabbits, for the back of my and Alec's wedding announcement I did a spot illustration of the rabbits eating and reading our letters.
Check out the awesome cover image that Alec illustrated for the announcement.
Friday, February 15, 2013
Phase 7 Table Banner
I just finished making Alec a Phase 7 banner to cover his table at conventions. If you are in the Los Angeles area you should come out and see it in person at the LA Zine Fest on February 17th.
I made it out of polyester poplin because it's tough and somewhat wrinkle resistant, it should last a long time. The letters are machine appliquéd onto the background.
Subscribe to:
Posts (Atom)