ClaireSanders.com
Portfolio About FAQ store blog

Monday, October 17, 2011

Alec's Hat

AHHHHHHHHHHHH!!!
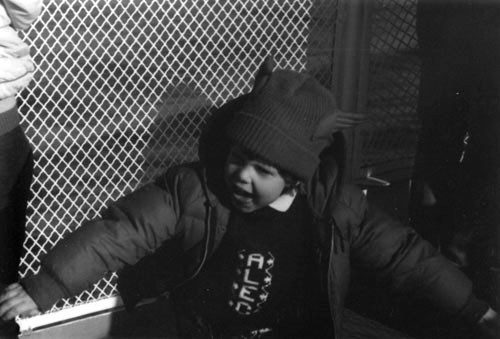
The original hat
The replacement hat

Alec used to have a blue hat with red wings on it.  He sadly lost it on the subway in New York a few years ago.  For his birthday he wanted a replacement.  Instead of trying to search one out,  I made him a replacement since I love to knit.  I knit the cap out of blue wool yarn and made the wings out of red cotton flocked fabric.  I only had one reference photo of the original but it was most likely made of double layers of acrylic yarn.  Instead of making it double,  I made the whole thing in a 1x1 rib knit. So both inside and out it looks the same, and it's stretchy and comfy.  I think I did a decent job mimicking the original but also making it a custom hat.


Monday, October 10, 2011

Wizard Robe

 Halloween is approaching fast, and it's my favorite holiday.  Last year,  due to a recent move and being sick, I didn't participate.  This year I'm trying to make up for it.  Alec is going to be Dumbledore,  because it's the last year he will have his epic beard.  I'm going to go as Hermione,  so we compliment each other.  I'm going to go as polyjuice mix up  cat Hermione so it's extra fun.

When Alec and I went to the Wizarding World of Harry Potter last January,  they had all the house robes,  but they were over-priced and cheaply made.  Instead I picked up an official Hogwarts crest patch so I could make my own custom robe.

I created the robe pattern by expanding a tent sloper to full length and adding bishop style sleeves and a hood. This is not a replica of the movie robes by any means.  I didn't fully line this robe,  it just has facing pieces to finish the opening.  It is a generic Hogwarts robe, as it doesn't have any of the house colors for the lining. This way it can be any character's robe.

 To make it, I was trying to use material I already had around the house.  I didn't have the right kind of buttons in black, so I just found the right size in my button collection and covered them in the same fabric as the robe.  I used a lightweight woven cotton that I had found at a fabric re-use place in Portland.  I would recommend a heavier weight synthetic that resists wrinkling if I was going to make it again.  There are in seam pockets on the sides for wands and chocolate frogs.


If you would like to make a robe similar to the one I made,  here is the rough pattern.  Print this out and blow it up until it is the size of the measurements stated.  This is a very roomy robe that could fit a large range of sizes.
*Addition April 18, 2013*
Here are the really rough instructions on how to put the pattern pieces together. If you've never sewn before this isn't enough information for you to put the robe together correctly, it's just a loose guide for people who've sewn from patterns before.

click images to view larger

Friday, September 30, 2011

Snail Mail

 I know the US Postal Service is facing major cutbacks and is transitioning to fit our now digital world.  As one fantasy solution, wouldn't it be cute if actual snails delivered the mail?


I whipped up a toy snail that shows how it could work.  Unroll the snail's shell to reveal a pocket in which to place your letter.  Once your letter is in,  roll the shell back up and secure with a snap. The snail slowly moves on its way to deliver your very important letter.


 I'm planning on making some more snails in different color combinations, then putting them up for sale on etsy.

Wednesday, September 21, 2011

Pigeon molding experiment

I had a dream a couple of years ago about city wall space getting so sparse that people starting spraying graffiti on live pigeons.  It seemed like a crazy concept,  so I thought I might try to sculpt some pigeons and then paint graffiti pieces on them.

I have made different kinds of molds throughout the years,  but I wanted to try some potentially more environmentally friendly materials.  Silicon is a great molding material as it picks up excellent detail and cures very quickly.  The problem with silicon is that after you're finished using the mold,  it's gonna be around for a long time.  Looking up some options, liquid latex seemed like a good fit for what I wanted.  It's natural, coming from the rubber tree, it will eventually break down and it holds excellent detail.  It is mildly toxic as the liquid part contains ammonia.  Since it's so flexible,  an additional mother mold is needed to hold it in place. By using plaster to make the mother mold,  I'm still using a material that will naturally break down.

I sculpted a sleeping pigeon using Roma Plastilina #2 medium,  I've used this material with success before.  I like that you can use it over again since it's oil based and doesn't dry out.  I did have some problems creating details.  With the summer heat,  it stayed pretty soft at room temperature.  I was constantly sticking my sculpture in the freezer to cool it down so I could carve out more intricate details.  In the future, for small detailed items I'm going to try either #3 or #4 hardness or Castiline.

Original pigeon in plastilina
I purchased liquid latex through the Compleat Sculpter in New York.  It was really easy to apply the latex with a brush, but it is a slow process since you need to wait for each layer to dry.  It took about a day,  since I worked on other things as each layer dried. After 9 layers, the latex mold was complete and I was ready to make the supporting mother mold.

Latex covered sculpt, I added additional pieces to the back to remove the undercut

My sculpture has undercuts, so I had to make a 2-part mold mother.  I used more plastilina to divided the mold into two parts, then poured the first part in plaster.  After the plaster set (about 45 minutes),  I still waited about 2 hours for it to really set and dry.  Then I applied one coat of liquid latex to the finished plaster side so that the 2 parts of the mold wouldn't stick to each other.

First half of plaster mother: I thought using a plastic jug would make it easier for the mold, but I was wrong.

 I poured the second part of the mold, then waited a couple more hours for all the pieces to dry before pulling it apart.

Two part plaster mold encasing the latex mold

I made a cast using more plaster.  Latex is pretty great because it doesn't stick to much, I was able to cast without a mold release agent. Maybe latex is too flexible, because I had some problems getting it to sit right in the mother.  In some ways,  it's awesome to play up the distortion factor you can get with latex, but that's not what I was looking for with this project.  After a couple wonky looking plaster pigeons,  I decided that I was too sloppy with the first mold and attempted another.  By making the pigeons out of biodegradable plaster,  I don't feel bad about throwing my mistakes away.

A mutant pigeon

The second time I made a 4-part mother and was much more careful about dividing the mold into pieces and molding them with care.  I also made a rectangle box support to hold the mold while it cured.  The 4-part mold worked a lot better,  maybe because it was my second time doing it.


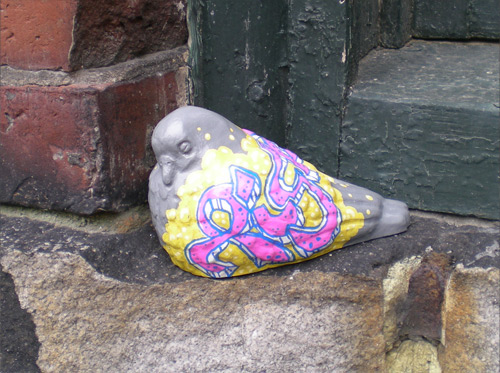
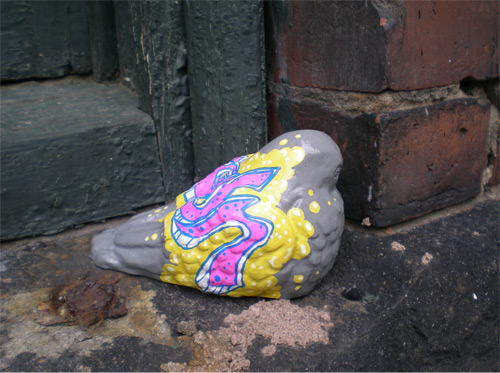
Once the mother mold had cured,  I cast a pigeon in plaster.  I painted the undercoat in grey gloss enamel spray paint (so much for environmentally friendly.)  Then I used paint markers to create the graffiti.

Graffiti Pigeon sculpture

I'm happy with the result. It pretty much looks like the dream I had, except for the pigeons were still living in my dream, but I don't condone painting any living thing with spray paint.

Monday, August 29, 2011

Squirrel Puppet

Alec and I have some grand plans to start making puppet show videos.  Both of us have a lot of ideas,  but we also have a lot of higher priority projects.  It may take awhile before we're making any videos, but the first step for me is to start making the puppets.


My first try is this squirrel, a simple hand puppet.  Made of fleece, faux fur, and wool tweed.  I made him a wool, cable knit sweater to prepare him for the coming fall.  I think this guy is cute, but needs some work in the actual puppeting part.  He can move his arms and head but in a limited fashion.  At least he can always be a backup dancer if he can't cut it in a starring role.


Wednesday, August 17, 2011

Lilly Pulitzer Jacket Re-mix

I recently took this awesome, bold printed Lilly Pulitzer Mens Stuff jacket and cut it down so that it would fit me.  I used the same pattern set that I used for the color swatch dress, this time following the jacket pattern.  The choice of pattern was determined by whether it used the same or less fabric than the original.  The original jacket is classic men's single breasted style with a two-part sleeve.  The new jacket style is a loose, boxy shape with a low yoke that shapes the bust.  I made a point to keep as many of the original's details including the flap pockets and the awesome gold lion buttons.  The original jacket was only partially lined,  so I did have to purchase new fabric for the lining. Amazingly, even though the new jacket is a lot smaller, I used almost all of the original fabric.


History of the jacket:
Last year,  Alec's grandfather,  E. Howard Goodwin passed away.  He was a very sharp and classy dresser during his life.  Alec inherited his grandfather's amazing tie collection along with a couple bright suits from Lilly Pulitzer's Mens Stuff collection dating from the late 1960's to early 1970's.  Since Alec is not one to wear bright, bold prints he gave the pieces to me to do whatever I wanted.  I only met Howard through video chat before he passed,  but now I have something to continually remind me of him.


Inside the jacket was this neat, old tag from the Amalgamated Clothing Workers of America union.
A nice touch from times past.


Wednesday, August 3, 2011

Dana & Jon's Wedding Quilt

Wedding Quilt


This past weekend,  my friend's Dana and Jon got married in Seattle.  I made them a quilt as their wedding present.  I looked at many existing quilt designs for inspiration,  since a quilt for a wedding is somewhat of a tradition.  Instead of tackling a traditional quilt like double rings,  I made up my own pattern.  I used Illustrator to create a patch that could be repeated and rotated to make an interesting design.  Since I currently live in such a small town I ended up picking up fabrics whenever I went on trips so the materials were collected in New York and Portland, OR.  The quilt measures about 78" x 78" and is 100% cotton, including the batting.  There are 2,400 individual pieces making up the full pattern and it took me 130 hours from start to finish.

Wedding Quilt
Front
Color-wise I hadn't been to Dana's house in awhile so I wasn't sure what to pick. I did know she likes yellow so I made that the connecting color.  Since blue is a complementary color to yellow I chose a couple different patterns and shades to create the background.

Wedding Quilt
Back
I incorporated a zia symbol into the quilting since Dana loves her Santa Fe hometown. The interconnected rings in the center are trying to really drive home the marriage part.

Check out more photos on flickr